Friday, July 30, 2010

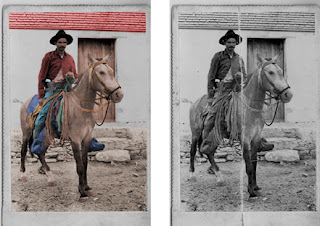
Dear Old Grandfather- Retouching & Handcoloring

The purpose of this assignment was to repair the photo and colorize it. Completing this assignment entailed editing the photo first by removing all creases, dust and scratches. The next step was to colorize it using the quick mask tool. The first step was to make another layer and duplicate it to create a before and after template. Next, using the stamp clone tool and healing brushes the crease was removed. Then, using the history brush tool the dust and scratches were removed. After the image was finally recovered from the folds and scratches, it was opened in a new document to start coloring. This assignment was huge on quick masking. All of the main body parts were quick masked such as the bridle, rope, and horse, and then colored. However, some selections conflicted with the main ones so they were subtracted through loading selections. Each layer was made in an adjustment layer which allowed the changing of the the hue and saturation. The product was a recovered picture with no creases and no dust or scratches and colorized. The only software used for this project was Adobe Photoshop. It was difficult because the stamp clone tool was hard to use but by the end of using the tool the picture really looked good. Also, the masking was a difficult because some areas were hard to color such as the rope area. In the end, this project challenging but it was great to test your abilities and skills of Adobe Photoshop.

Family Retouch

The purpose of this project was to familiarize ourselves with photo repair in Adobe Photoshop. By now we knew how to use the canvas size, so they layers were duplicated and formed a before and after template. Next, a heal layer is made and using the clone stamp tools and healing tools the tape is removed. Then, the dust and scratched were removed with the history brush tool. Lastly, the man's nose was gone; therefore, we copied another man's nose in the picture and placed it on his face. Adobe Photoshop is very hard to become skilled at, but this assignment helped a lot to build those skills. It was a difficult assignment to catch all the dust and scratches.

Wednesday, July 28, 2010

Photo Retouch- Flawless Skin

The purpose of this assignment was to show our skills of retouching a photo creating flawless skin. The whole project was done in Adobe Photoshop. This project required you to use this girl and use photoshop to remove the glare and add make-up. The most important step in Photoshop is to duplicate the original layer. In addition, it allows you to make a before and after image by adding pixels using the canvas size. Next, a healing brush was used to remove the glare on the forehead, cheeks, and nose. After, it was important to flatten your layers which basically is merging two layers together. Another tool we used was load selection, which gave the face a crisper look. Another thing we learned through this assignment was adjustment layers which allowed us to change the hue and saturation. The eyes and the lips were quick masked in order to change the colors of them. This assignment really tested our skills with the brushes used in Adobe Photoshop. The final product was a girl with beautiful flawless skin and some make-up to add color. The only difficulty was using the healing brush to remove the glare completely. However, I feel like the glare partially removed adds dimension to her face. Other than that, it was a great assignment to master Adobe Photoshop.


Travel Agency Ad using Quick Mask

The purpose of this assignment was to create an advertisement using the skills learned in the NextCo advertisement. This assignment was done in Adobe Photoshop as well. The process of opening the documents in Photoshop was the same. Next, the canvas size needed to be set up adding more sky and making the page 8.5" by 11". More sky space allowed room for the images to be masked. In order to mask, the most important tool is the gradient tool. The images I used to mask onto this beautiful scene of Greeec are common things done there. Therefore, this would be a successful advertisement for a travel agency. The final product is an advertisement and is functional. Adobe Photoshop is a great program to use because of the quick masking.

NextCo using Quick Mask

The purpose of this project was to use quick mask in Adobe Photoshop. In order to complete this assignment, the cell phone and the airplane needed to be quick masked on the city image. However, adding pixels was also part of the requirement by using the canvas size tool. First, the city was opened in Adobe Photoshop. Next, the airplane and the cell phone were dragged onto the city image. With the gradient tool, the airplane and the cell phone was masked allowing the images to blend into the sky. The final part of this assignment was to use level and embossing to create a shadow with the text. The final product is a traveling advertisement. Using the quick mask tool allowed myself to become more experienced with Adobe Photoshop.

Notepad

The purpose of this assignment was to make a functional notepad yet personalized and creative. With the standard paper I used I made three notepads: two small, and one big one. I mostly used the Illustrator pre-made symbols to design each notepad. Each notepad had to be in black and white; therefore, the color mode was set in greyscale. The final product was made in Adobe Illustrator. After the cutting and padding, the last product was a notepad. The padding was somewhat difficult because of the large amount of paper used. The technique of applying glue every 15 minutes was very efficient. Once the padding was dried, the notebooks sat under pressure for a few ours to flatten any curves in the padding. Overall, it was a fun and easy assignment that demonstrated the skills needed for Adobe Illustrator.

Marbled Paper Book

The purpose of this assignment was to be able to follow an example of the booklet, which was a step by step process. First, paper was placed in water with colored, oil paints. A popsicle stick was used to make designs with the oil paint. Because it was oil paint it took a day or so to dry and then it was time to assemble the booklets. The inside is made of cardboard and was covered with the painted sheets using a special glue. Next, a stake of papers cut in the size of the rectangle shape was added to the booklet. A hole punching machine was used to make holes in a thick stack of paper. Finally, two screws were placed in the holes to bind the booklet together. The only difficult part of the project was the hole punching; however, I liked the creativity part of the assignment. The booklet is also functional as a notepad.


Tuesday, July 27, 2010

Invitation Design

The purpose of this assignment was to get familiar with the canvas size feature of Adobe Photoshop. To complete this assignment, I set up the size of the invitation using the canvas size. Then, an image was added as well as the heading. Stroke was also utilize in this assignment. A dummy was made as well to help create the invitation format. A dummy is very useful for a designer to be efficient and accurate. I also learned it is important to be very exaggerating when using fonts. Either the font should be the same or very different in size and type.

Zoo Post Card

The purpose of this project was to apply our techniques learned from Photoshop. This project tested our ability to resize photos, understand resolution, crop photos, combine photos, align layers and stroke a selection. To complete this project, a postcard was to be created using an animal of choice but also being aware of the position of the pictures. Alignment and stroke was very important for this postcard to look precise and formal. Photoshop was the only software used for this project. This assignment taught about the use of stroke when to use it and what is proper to stroke and it also showed the importance of alignment.

Monster Indesign

The purpose of this assignment was to learn the techniques of InDesign. The template of this ad was given and all the need material. However, we had to use our skills and knowledge of InDesign to put this advertisement together. The finish product included the similar fonts and font sizes of the orginal copy and an exact replica of the position of the monster. The font must also represent similar type leading of the original copy. Also, the three icons must be a part of the monster itself. This was a good assignment to get familiar with InDesign.

From Commodities to Culture

The purpose of this project was to isolate images from a background that was non-solid and arrange each image into a layout. In order to complete this project, at least objects images weer to be isolated from at least nine images and placed on a solid color background in a creative layout, including a heading, sub heading, and body copy. To prepare for this project, we had to use selection tools in Adobe Photoshop to create a melon head in a certain amount of time. The final product is a thumbnail spread. The images came from google. The selection tools used to cut out the objects form the images include the magnetic lasso tool, the lasso tool, the marquees, the magic wand and much more. The most important keys used in this project was option command and drag. The software used throughout this project was Adobe Photoshop. This was a great assignment to master thepen tool in Adobe Photoshop. It also gave us an idea on fonts that were appropriate for this particular assignment and would attract a large audience.

Animation Magazine Cover

The purpose of the Animation Magazine Cover was to show how to use Photoshop and Illustrator thoroughly and efficiently. In order to complete the assignment, there needed to be three teasers, an image of character self-made, only two fonts used, a headline, a subheading, the volume, the date, and the barcode. The final product was a magazine cover with the cartoon character, which was created in Adobe Photoshop. First, a hand copy of the girl was scanned onto the computer. Next, using the pen tool mostly, the character was traced. Finally, color was added to each layer starting from head to feet. The final magazine cover was finished in Illustrator, where the heading and subheading were added. It was a very difficult task to make the cartoon character considering the detail of the picture; however, this assignment improved my skills in Photoshop. It also taught me about excellent font choice and font colors.


Friday, July 16, 2010

Type Specification

The purpose of this assignment was to identify the type, set the type, and recreate the type in InDesign. Throughout this process, we learned some basic measurements such as 1 pica equals 12 points, 6 picas equals one inch, and 72 points equals one inch. The finished product was the recreation of the type with the measurements on the side. The measurements include type size, font and style, type leading, and alignment and line length. Type leading is the space between lines of type and is measured from baseline to baseline. Alignment means whether the text is to the right, left, center, or justified. The final product was measured to see if the recreated type matched the original type through a glass table. This assignment was a good way to get familiar with type and type size and its formatting for various projects.


Symbol Project

The purpose of the symbol project was to create a magazine cover. The whole project was made in Illustrator. This assignment required the use of scale tool, rotation tool, selection tool, spiral tool, and action pallet to make the flowers for the nature theme of the fashion magazine. This assignment also taught us how these tools can make shapes to form an object. The project also taught us about layers and how to use them. The first layer was the background, the second layer was the headline and subheading, the third layer was the flowers and model figure, and the last layer was the body copy. The last step was to mask the whole image. To mask an image, first group the whole image. Then, use the marquee tool to make a square that covers the image completely. Press command seven and masking is complete. Layers allowed us to change what was just in the layer as opposed to changing the whole illustration. The final product is a magazine article. The symbol project showed us how to use many of the Illustrator tools to create our own image, which was very convenient. In addition, the gradient tool provided the symbols to have a three-dimensional look.

Black Square Project


The purpose of Black Square Project was to organize four black squares portraying the words playful, congestion, order, increase, tension, and bold. Also, another set of thumbnails were to be prepared using the definition of the word and portraying the meaning through its set up. First, the thumbnails with the black squares were prepared on Illustrator. Next, the booklet for the thumbnails was set up in InDesign. The final product was a book with graphic illustrations. Before the computer was used, thumbnails and roughs were produced. Then, the thumbnails were recreated on the computer through Illustrator. Then, the set up of the booklet was completed in the program InDesign. Finally, the booklet was printed out and cut to size. To finish it off, it was stitched together with a machine. InDesign was a great program to use because it was very organizational. This assignment taught me that using a measuring device is very important.